
Scrollytelling with GSAP ScrollTrigger
June 7, 2020
What is GSAP and what is ScrollTrigger?
GSAP (aka GreenSock) is a JavaScript library for making animations. It simplifies animation, making it easy to build performant and robust animations. A couple weeks ago the folks at GreenSock sent out a couple of teaser tweets, and then dropped their new ScrollTrigger plugin, which is kind of incredible. I had little experience with GSAP, but I randomly took ScrollTrigger for a spin on a Friday night, and 30 minutes later I had a pretty impressive scroll-based animation.
There’s lots of ways to do scrollytelling in JavaScript, but probably the most popular library is Scrollama. And Scrollama is pretty wonderful, so why would you use GSAP and ScrollTrigger? Well, probably the biggest incentive is the integration with GSAP animations. As mentioned previously, GSAP is the premiere library for building complex animations: it has a flexible API, it’s super fast and handles all kinds of cross-browser inconsistencies, and it can animate just about anything (SVG, DOM, Canvas, and WebGL). GSAP is already widely used in dataviz and evangelized by several practitioners (most notably, by dataviz queen Shirley Wu). Now with the ScrollTrigger plugin, all those powerful animations can be triggered to a scroll with just a few lines of code—and all the great performance and cross-browser compatibility you expect from GSAP comes with it. The other advantage is that ScrollTrigger is just packed full of useful features (built-in scrubbing and pinning!) and has a remarkably flexible API that makes it really easy to do things like adjusting trigger start and endpoints without altering the trigger element.
See the demo ↗
Two ways to create scroll triggers
There’s two ways to create a scroll trigger. If you want to trigger a GSAP animation, you can add a scrollTrigger object to the GSAP tween. This object will define the parameters of your scroll trigger, like the element that should trigger the animation, the scroller positions, whether the animation should scrub, etc. Here’s an example. In this case, we have an imaginary element with a class .animating-element that we want to animate. An ordinary GSAP tween would be defined using gsap.to() or gsap.from(). To make this into a scroll-triggered animation, we just add the scrollTrigger object. How the scroll trigger behaves will be based on all those options inside the object (more on those later), but this is the essence of it, this element will now animate on scroll.
gsap.to(‘.animating-element’, {
  scrollTrigger: {
    trigger: ‘.animating-element’, //this is the element that will trigger the animation
    start: ‘top center’, //this string defines the trigger and scroller start
    end: ‘bottom center’, //this string defines the trigger and scroller end
    scrub: true //this tells GSAP to link animation progress to scroll progress
  },
  y: ’50%’, //translates the element downwards by 50%
  color: ‘red’ //transitions the color to red
})
The second method for creating a scroll trigger is generally used when you’re not linking it directly to a GSAP tween function (although you can pass it a GSAP tween like a timeline via the animation option). For example, maybe you just want to pin an element in place when it enters the viewport, or you want to toggle a CSS class when an element hits a scroll trigger, or run some custom D3 or JS function on a scroll trigger. To do this, call ScrollTrigger.create() and pass in an object with all of your scroll trigger options. Let’s say we have an SVG element with the class .chart, and when it hits the middle of the screen we want to toggle a CSS class to make the element visible and also run a D3 function that will draw some points. Assuming we have our data set up and our D3 draw function already defined, this is how we can do it:
ScrollTrigger.create({
  trigger: ‘.chart’,
  start: ‘center center,
  end: ‘bottom top’,
  toggleClass: ‘.visible’, //this toggles the specified CSS class on the trigger element
  onEnter: drawPoints //this fires the drawPoints function when the trigger enters the scroller from above
})
Scroll trigger options
There’s a bewildering array of options you can pass to the scroll trigger object. I highly recommend you read the documentation and watch the very helpful videos GreenSock has put together, but here I will go over some of the most important and useful for scrollytelling.
Triggers
- The only required option is
trigger. This defines which element triggers the scroll interaction. Importantly, this does not have to be the same element that is animating. - By default, the
triggerelement will define both the start and end trigger, but if you want a different element to be the ending trigger for an animation, you can specify that withendTrigger
Start and end
- The
startandendoptions control exactly which scenarios will define the start and end of an animation. An animation starts when the ‘trigger-start’ intersects with the ‘scroller-start’, and ends when the ‘trigger-end’ intersects with the ‘scroller-end’ - By default the trigger starts at the top of the trigger element, and ends at the bottom of the trigger element, and the scroller starts at the bottom of the viewport and ends at the top of the viewport
- The
startoption sets the trigger start and scroller start positions, for example using the stringcenter bottomwill set the trigger start to the ‘center’ of the trigger element, and the scroller start to the bottom of the viewport. Theendoption does the same for the trigger and scroller ends - You can specify these positions with keywords, numbers (pixels relative to the top of the screen), percentages, functions, or basically any combination of the above. See the documentation for full details
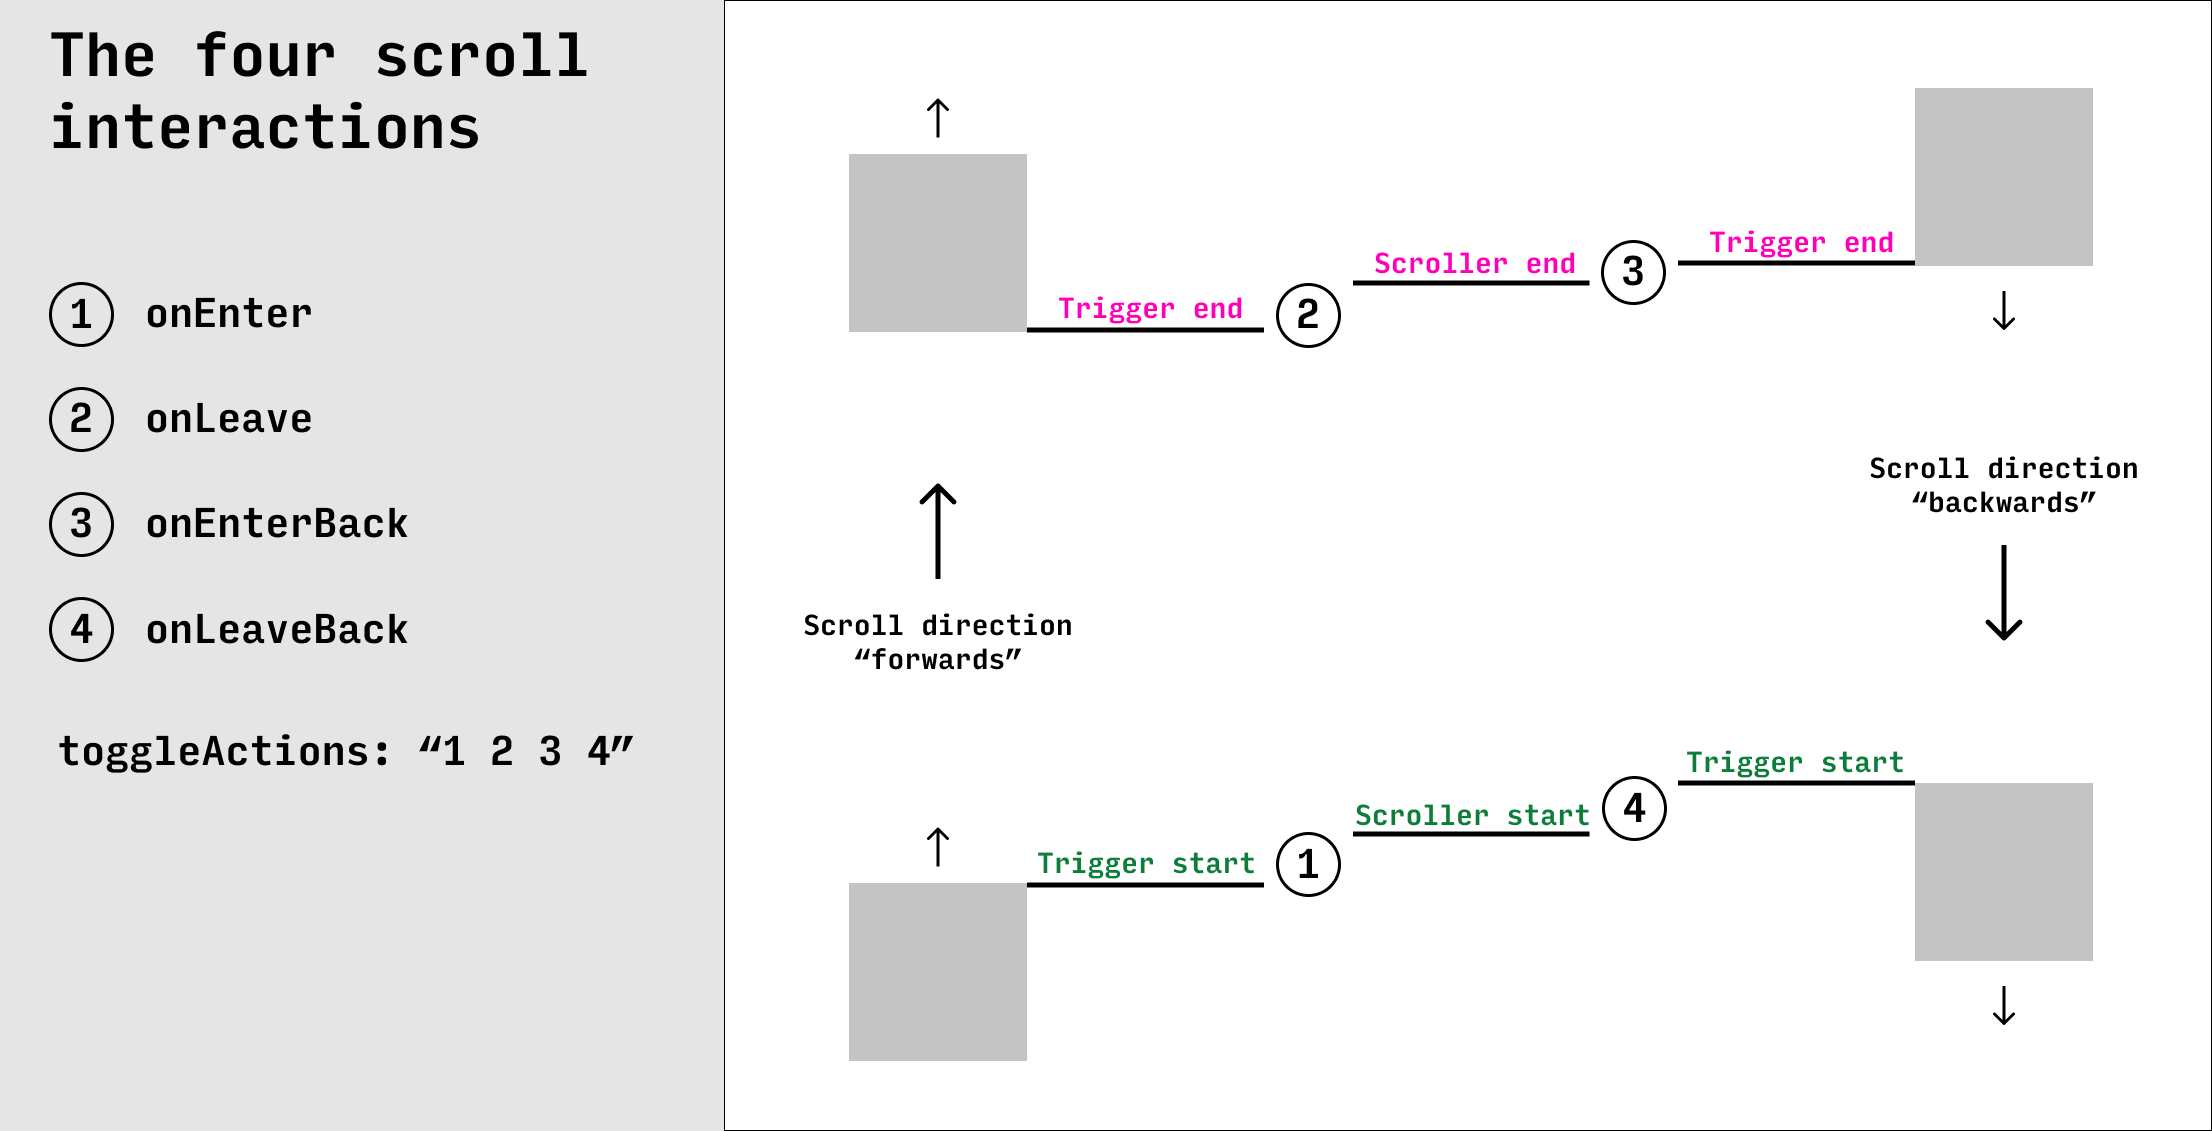
OnEnter onLeave onEnterBack onLeaveBack
- These options allow you to run a callback that fires in one of the four scenarios: the element enters from above, the element exits from above, the element enters from below, the element exits from below
- These are especially useful for running some custom animation code, and they come with built-in properties like the scroll progress, direction, and velocity
ToggleActions
- A string that controls how the animation is controlled at the four toggle positions mentioned above
- Assuming you are using a GSAP animation, this is super handy because you don’t need to come up with separate animation code to handle reversing your animation when a user scrolls backwards, you can just specify
”reverse”in the toggleActions. See the documentation for all other options. - All of this start, end, and scroll interaction terminology is demonstrated by this figure:
Scrub
- A ‘scrub’ animation is when the animation progress is linked to the scroll progress, so that when you just enter an element, the animation will barely start, when you are 50% scrolled into an element, the animation will be halfway finished, etc.
- With GSAP, to make an animation ‘scrubbed’, just set
scrub: truein the options. You can also setscrubto a number, which will cause a slight delay in the animation compared to the scroll progress, so that the animation will take X seconds (where X is the number you specified) to catch up to the scroll position
Pin
- A common pattern in scrollytelling is to have one element—often your chart—‘pinned’ (ie, static) while boxes of explainer text scroll past
- In GSAP, just set
pin: trueto pin the trigger element, or pass a CSS selector topinto pin any other element
Tips and tricks
ScrollTrigger has only been out for about a week. This means I haven’t been able to test all scenarios or figure out all the quirks and best practices (nor has anyone else for that matter). Let this server as a disclaimer that my example code in the demo may not be perfect (also it has not been sufficiently tested). Having said that, I have picked up a few tips in my tests.
- A very handy pattern for setting up scrollers on multiple elements, especially if you need to use a different value for scroll or animation options, is using GSAP’s
toArraymethod along with aforEachloop. Something like this:
gsap.utils.toArray(‘.step’).forEach((el, i) => {
    gsap.to(el, {
        scrollTrigger: {
            trigger: el,
            scrub: i * 0.2
        },
        x: ’400px’
    });
});
This selects every element with the class .step, puts them into an array, and then within the loop we set up a new GSAP tween with a scroll trigger for each element.
By default, pinning an element adds padding to the bottom of it so that the following content catches up perfectly. My experience trying to set up a side-by-side pinned chart was that this extra padding screwed up the spacing of the explainer boxes. If you want to do a side-by-side type story, you can add
pinSpacing: falseto the scroll options.If your trigger and/or scroller start and endpoints seem messed up, look to see if any of the trigger elements are animating, or other elements on the page are somehow changing dimensions. ScrollTrigger does not constantly watch for updates to the size or position of elements in the viewport, instead it pre-calculates the position of all triggers and only updates on page resize. If something seems wonky with your triggers, it could be caused by changes in the size or position of triggers. To re-calculate the trigger and scroller positions you can call
ScrollTrigger.refresh().